Your development environment works perfectly. Staging was flawless. You finally flip the switch to migrate your company's production server to a new host. Ten minutes later, your phone rings—the website is down for the CEO, but it still loads fine on your laptop. Meanwhile, the customer support team reports that inbound emails are bouncing.
Welcome to the nightmare of DNS propagation.
When a server migration goes wrong, the problem is almost never the code. The culprit is the Domain Name System (DNS)—the invisible, globally distributed web of caches that dictates how the internet finds your application. A single typo in an IP address, a misplaced trailing dot, or a misunderstood Time-To-Live (TTL) setting can take an entire multi-million dollar infrastructure offline.
In this comprehensive 2026 migration checklist, we will walk you through exactly how to troubleshoot routing issues, bypass deceptive local caches, and use a reliable DNS lookup utility to ensure absolute zero downtime during your next major deployment.
Why Blind DNS Troubleshooting Always Fails
Attempting to troubleshoot a server migration simply by refreshing your browser is a recipe for disaster. This is because modern DNS relies heavily on an aggressive multi-tiered caching architecture designed to save bandwidth.
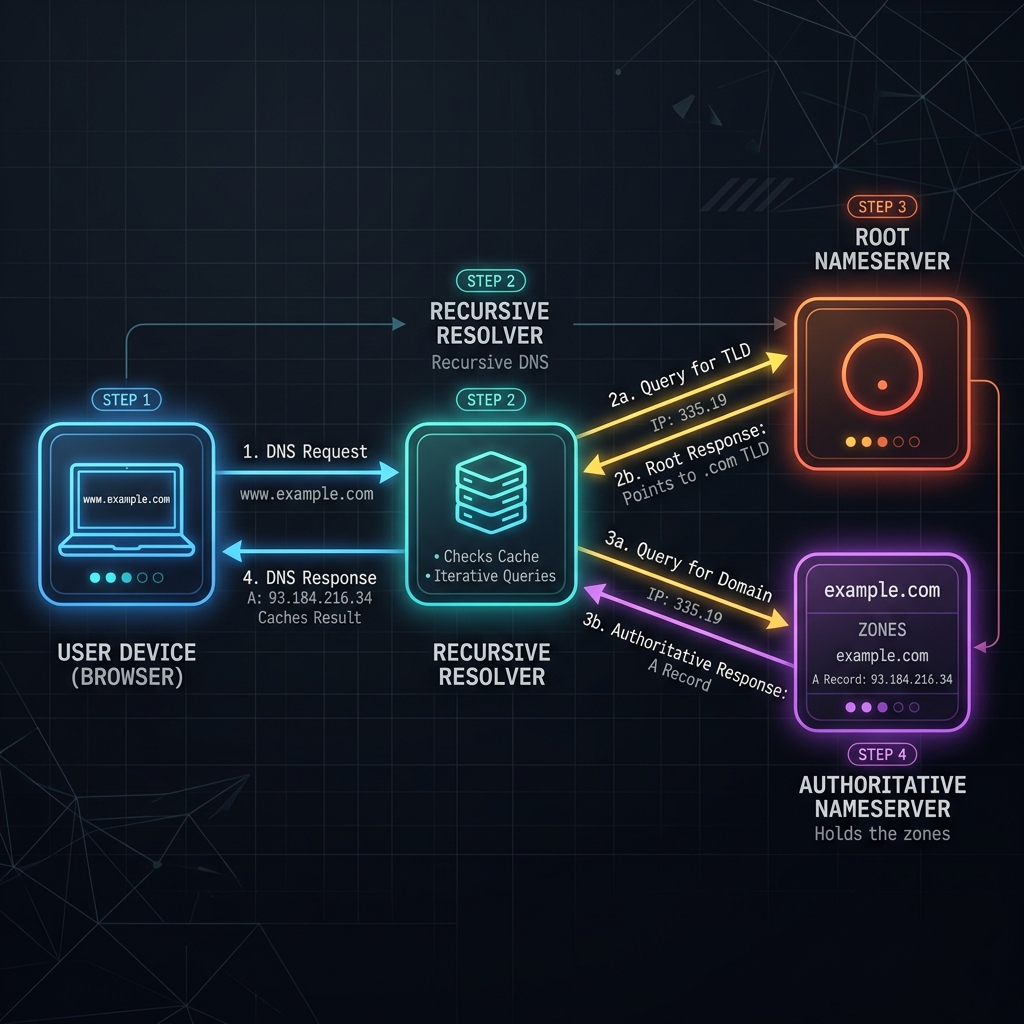
When you type your domain into a browser, your computer does not immediately ask the internet for directions. Instead, it asks its local operating system cache. If that fails, it asks your router. If the router fails, it queries a Recursive Resolver (usually managed by your Internet Service Provider, like Comcast or AT&T, or a public resolver like Google's 8.8.8.8).
If your ISP's recursive resolver looked up your website an hour ago, it will confidently serve you the old IP address from its cache until the TTL expires. This means you could be staring at your old server, while a customer in London is successfully connecting to the new one.
To truly see what is happening across the internet, you must bypass the recursive layer entirely. You need a tool that queries the Authoritative Nameservers directly. These are the final sources of truth that hold the actual, original zone files for your domain. They never cache data. When you query them directly, you see the exact configuration currently published to the world.
The Step-by-Step DNS Migration Checklist
Before you migrate your application, you must verify that your core routing architecture is correctly mapping to your new infrastructure.
Step 1: Open a Direct Authoritative Query Tool
Do not rely on your computer's terminal unless you are actively forcing a flush. Instead, open the FluxToolkit DNS Lookup tool. Our servers bypass local ISP caches and dispatch asynchronous queries directly to high-level authoritative servers, guaranteeing an unfiltered view of your domain.
Step 2: Verify Your Primary A and AAAA Records
A DNS A-record maps a human-readable domain name directly to a 32-bit IPv4 address. It is the single most critical record to verify immediately after any server migration. Enter your root domain and ensure the A record exactly matches your new host's IP address. If you are supporting modern IPv6 traffic, verify your AAAA records point to the correct 128-bit hex address.
Step 3: Validate Your CNAME Aliases
A CNAME (Canonical Name) record maps an alias to another domain name. If your www subdomain points to your root domain, ensure the root domain is resolving correctly. Never point a CNAME to another CNAME, as this creates a fragile lookup chain that degrades Time-To-First-Byte (TTFB) latency.
Step 4: Confirm MX Records for Email Continuity
Migrating a website does not mean your email should stop working. If you are changing DNS providers during your migration, verify that your MX (Mail Exchange) records have been ported over correctly. The tool should display the priority numbers and the exact hostnames (e.g., 10 aspmx.l.google.com.) responsible for receiving your mail.
Step 5: Check TXT Records for Authentication
Ensure your SPF (Sender Policy Framework), DKIM, and DMARC TXT records have migrated untouched. Missing these records will instantly cause your legitimate transactional emails (like password resets or receipts) to be flagged as spam by major providers.
DNS Record Types Quick Reference
| Record Type | Purpose | Example Value |
|---|---|---|
| A | Maps a domain directly to an IPv4 address. | 192.168.1.1 |
| AAAA | Maps a domain to an IPv6 address. | 2001:0db8::8a2e:0370:7334 |
| CNAME | Creates an alias from one domain to another. Cannot be used at root. | example.com |
| MX | Specifies the mail servers responsible for receiving domain email. | 10 mail.google.com |
| TXT | Holds arbitrary text. Used for SPF, DKIM, and site verification. | v=spf1 include:_spf.google.com ~all |
| NS | Delegates a DNS zone to specific authoritative name servers. | ns1.cloudflare.com |
| CAA | Specifies which Certificate Authorities can issue SSL certificates. | 0 issue "letsencrypt.org" |
5 Pro Tips for Zero Downtime
Professional system administrators use specific strategies to make server migrations invisible to end-users. Follow these best practices:
1. Lower Your TTL 48 Hours in Advance
Until a DNS record's TTL (Time To Live) expires on every upstream resolver worldwide, some users will continue routing to your old server—regardless of when you made the change. If your A record's TTL is 86400 (24 hours), you must manually lower it to 300 (5 minutes) at least 48 hours before your migration. This ensures that when you finally update the IP, the global internet recognizes the change almost instantly.
2. Keep the Old Server Alive
Never shut down your legacy server the moment you update your DNS. Due to rogue caching by non-compliant ISPs, a small percentage of global traffic will inevitably continue hitting your old IP address for up to 72 hours. Keep the legacy server online and use a Redirect Checker to verify that any requests hitting the old server are properly 301-redirected to the new one.
3. Consolidate Your SPF Records
You cannot have multiple SPF TXT records on a single domain. If your new host requires an SPF inclusion, do not create a new TXT block. You must merge the new requirement into your existing v=spf1 string, otherwise, email providers will reject the authentication entirely.
4. Verify CAA Records Before SSL Issuance
If you are moving to a new host that automatically provisions Let's Encrypt certificates, check your domain's CAA records. If you have an existing CAA record restricting issuance exclusively to DigiCert, your new host's automated Let's Encrypt generation will fail, leaving your site without HTTPS.
5. Audit Historical Subdomains
Migrations are the perfect time to clean house. Review your zone file for orphaned A records or CNAMEs pointing to forgotten development servers or decommissioned landing page builders. These dangling DNS records are prime targets for subdomain takeover attacks by malicious actors.
Top 3 Migration Killers: Common Mistakes
Even experienced developers make syntax errors when editing raw zone files under pressure. Always double-check for these three critical mistakes:
Mistake 1: Placing a CNAME at the Zone Apex
The Problem: You want example.com to point to a managed service like Heroku or Vercel, so you create a CNAME record at the root (the apex).
The Fix: This explicitly violates foundational DNS RFC protocols. CNAME records cannot coexist with any other record types, but a root domain must have SOA and NS records. Putting a CNAME at the apex will silently break your email routing. Always use an ALIAS/ANAME record (if your DNS provider supports it) or standard A records for the root domain.
Mistake 2: The Trailing Dot Error
The Problem: You manually enter a new CNAME destination as ghs.googlehosted.com instead of ghs.googlehosted.com..
The Fix: In DNS syntax, a trailing dot signifies the absolute end of a fully qualified domain name (FQDN). Without the trailing dot, many registrars assume the entry is relative and will automatically append your domain to the end. Your intended route becomes the broken ghs.googlehosted.com.example.com. Always check how your specific provider handles absolute vs. relative routing.
Mistake 3: Forgetting the Proxy Status
The Problem: You migrate to a new server, update the IP address, but the DNS lookup still shows the old IP.
The Fix: If you are using a service like Cloudflare with the "orange cloud" proxy enabled, looking up your domain will always return Cloudflare's edge IP addresses, not your origin server's IP. To verify your new origin IP is correct, you must temporarily disable the proxy (grey cloud) or check your provider's internal routing dashboard.
Frequently Asked Questions
How long does DNS propagation take after a migration?
If you successfully lowered your TTL to 300 seconds prior to the move, propagation takes about 5 minutes. If you left your TTL at the default 24 hours, it will take up to 48 hours for global ISPs to flush their caches and recognize the new server.
Why does my new website still show the old server after updating DNS?
Your local computer or your router is likely caching the old DNS record. You can force a refresh on Windows by running ipconfig /flushdns in the Command Prompt, or simply test the domain on a cellular network to bypass your local WiFi's recursive resolver entirely.
Can I check if my DNS has propagated globally for free?
Yes. You can use our platform to perform a raw query against authoritative servers. This confirms whether your actual DNS provider has registered the change. To see propagation maps across different geographic regions, use global ping utilities.
What DNS records do I need to update when changing web hosts?
At a minimum, you must update your root A record (and AAAA if using IPv6) to point to the new server's IP address. If your new host is also taking over email handling, you must update your MX records. If you are keeping your email at Google Workspace or Microsoft 365, do not touch the MX records.
What is the difference between an A record and a CNAME record?
An A record maps a domain directly to a numerical IP address (like 192.168.1.1). A CNAME record maps an alias domain (like www.site.com) to another domain name (like site.com). CNAMEs are useful for mapping subdomains to a central point, but they require two separate lookups to resolve.
Ensure Flawless Migrations Today
Never deploy a major infrastructure change blindly. Before you announce that a migration is complete, you must verify that your routing is flawless across all record types.
Stop relying on cached browser data and start diagnosing like a professional. Head over to our completely free DNS Lookup tool to instantly verify your A, MX, TXT, and CNAME configurations directly from authoritative nameservers—no signup required. Explore the rest of our free web tools directory for more utilities designed to make your development workflow seamless.